Flow Layout is the key of Web UI, it is a more human natural mechanism of laying out UI/GUI widgets in the screen. With Flow Layout, UI widgets like buttons, labels, text-inputs are placed one by one into an area(rectangle) of the screen, each widget occupy its own area, normally, widgets are not overlapped.
Years ago, there is only Fixed Layout for iOS Apps development, Fixed Layout requres developers to determine the exact position(x, y) and size(width, height) of each widget, so it is so limited functionality, one of its most noticable weakness is that it can not properly deal with iPhone 4 and iPhone 5, because they have different screen resolutions.
Later Apple introduced Auto Layout layout, which is yet another Relative Layout. Flow Layout and Auto Layout(Relative Layout) are both adaptive UI layout mechanisms, both work fine with multi screen resolutions.
But the most significant between them is that:
- Flow Layout focus on one widget at a time.
- Auto Layout requires two or more widgets to work around.
Apparently, dealing with one thing is simpler than dealing with many things. So, Flow Layout is superior to Auto Layout, not mention that Apple’s Auto Layout over complicated.
Here is codes using Auto Layout(taken from https://github.com/Masonry/Masonry):
UIEdgeInsets padding = UIEdgeInsetsMake(10, 10, 10, 10);

[superview addConstraints:@[
    //view1 constraints
    [NSLayoutConstraint constraintWithItem:view1
                                 attribute:NSLayoutAttributeTop
                                 relatedBy:NSLayoutRelationEqual
                                    toItem:superview
                                 attribute:NSLayoutAttributeTop
                                multiplier:1.0
                                  constant:padding.top],

    [NSLayoutConstraint constraintWithItem:view1
                                 attribute:NSLayoutAttributeLeft
                                 relatedBy:NSLayoutRelationEqual
                                    toItem:superview
                                 attribute:NSLayoutAttributeLeft
                                multiplier:1.0
                                  constant:padding.left],

    [NSLayoutConstraint constraintWithItem:view1
                                 attribute:NSLayoutAttributeBottom
                                 relatedBy:NSLayoutRelationEqual
                                    toItem:superview
                                 attribute:NSLayoutAttributeBottom
                                multiplier:1.0
                                  constant:-padding.bottom],

    [NSLayoutConstraint constraintWithItem:view1
                                 attribute:NSLayoutAttributeRight
                                 relatedBy:NSLayoutRelationEqual
                                    toItem:superview
                                 attribute:NSLayoutAttributeRight
                                multiplier:1
                                  constant:-padding.right],

]];
With Flow Layout, it is one line of code:
[superview.style set:@"padding: 10;"];
Auto Layout could not (easily) work when you don’t know who is beside you; With Flow Layout you only concern about yourself, you don’t care who lies beside you.
Next, I will introduce the simplicity and power of Flow Layout to you, you will learn a new skill in one hour, for web developers, it is three minutes. Let’s go!
float: left or right
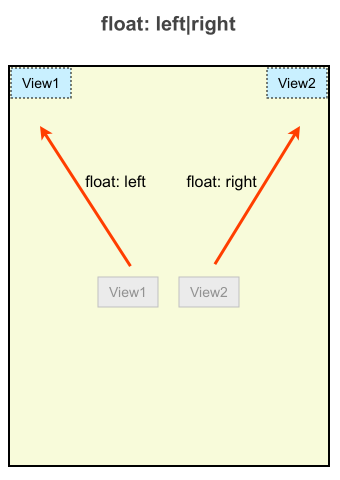
We want to place two views into the destination area(rect), but we don’t need to specify the coordinations of them, just let View1 to float: left, and then tell View2 to float: right. No matter how the dest area grows or shrinks, View1 will always lay at the top left edge, and View2 lies on the top right edge.
float: center
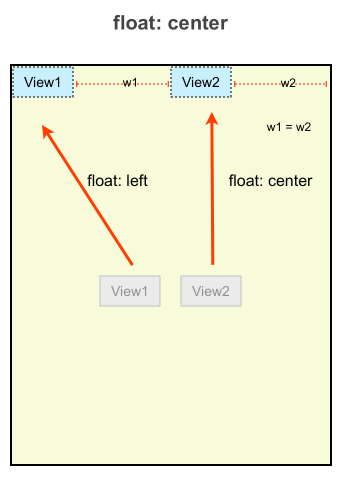
Place View2 at horizontal center.
when space won’t fit
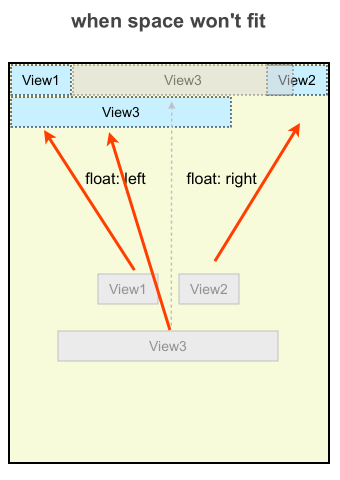
View1 is placed at left, View2 is placed at right. When placing View3, it first look for the space between View1 and View2, and it finds out that space is too small, so View3 will be placed stacked on top of View1.
clear: left – I do not allow any other widgets lay at my left
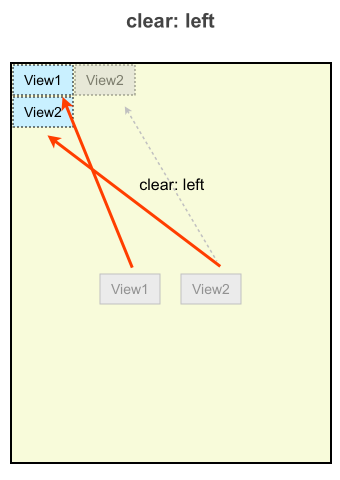
We apply clear: left on View2, so it will be placed stacked on top of View1, it will not be placed right nex to View1, because it requires no widget on its left.
clear: right
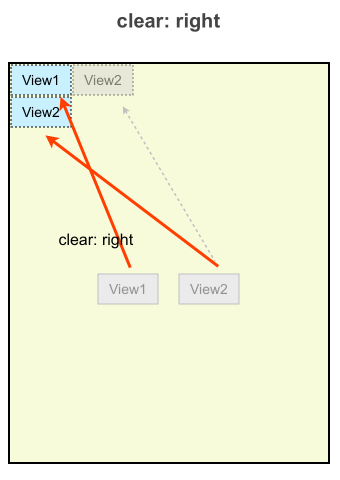
Imagine we apply clear: right on View1, the first widget being placed. Then View2 will not be able to occupy the space on View1’s right.
percentage width
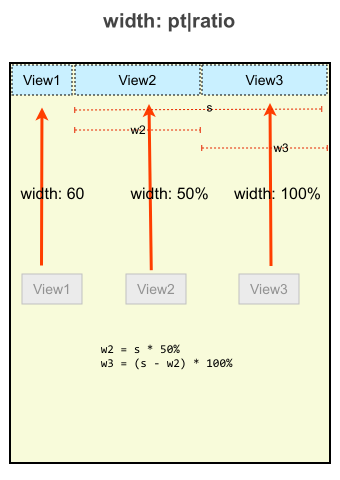
When specify percentage width of a view, it is not the percentage of its superview(the destination area), but the percentage of the space it is being placed.
So, if you want to implement an n columns layout, just specify ratio width of each view as:
- view 1:
1.0/n - view 2:
1.0/(n-1) - view 3:
1.0/(n-2) - …
- view n:
1.0/(n-(n-1))
The Box Model
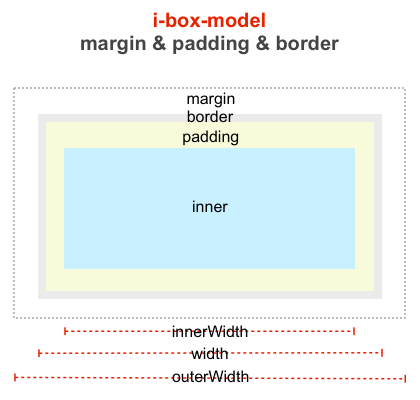
The Box Model of CocoaUI‘s Flow Layout consists of: margin, border, padding, inner. These properties are explained in the picture.
